Heading

Use Headings to guide people and search engines through your content.

We’re transitioning to a new UI, and are in the process of updating our Webflow University content.

Headings give structure to your web content and are crucial for readability. They're used by people and search engines.

A diagram displaying the concept of a user and a search engine using headings. Below the user and search engine avatar, two arrows point to a mockup article titled Learn all about beets with headings and paragraphs.

In this lesson:

  1. Add Headings
  2. Style Headings
  3. Edit Headings
  4. Format Headings

Add Headings

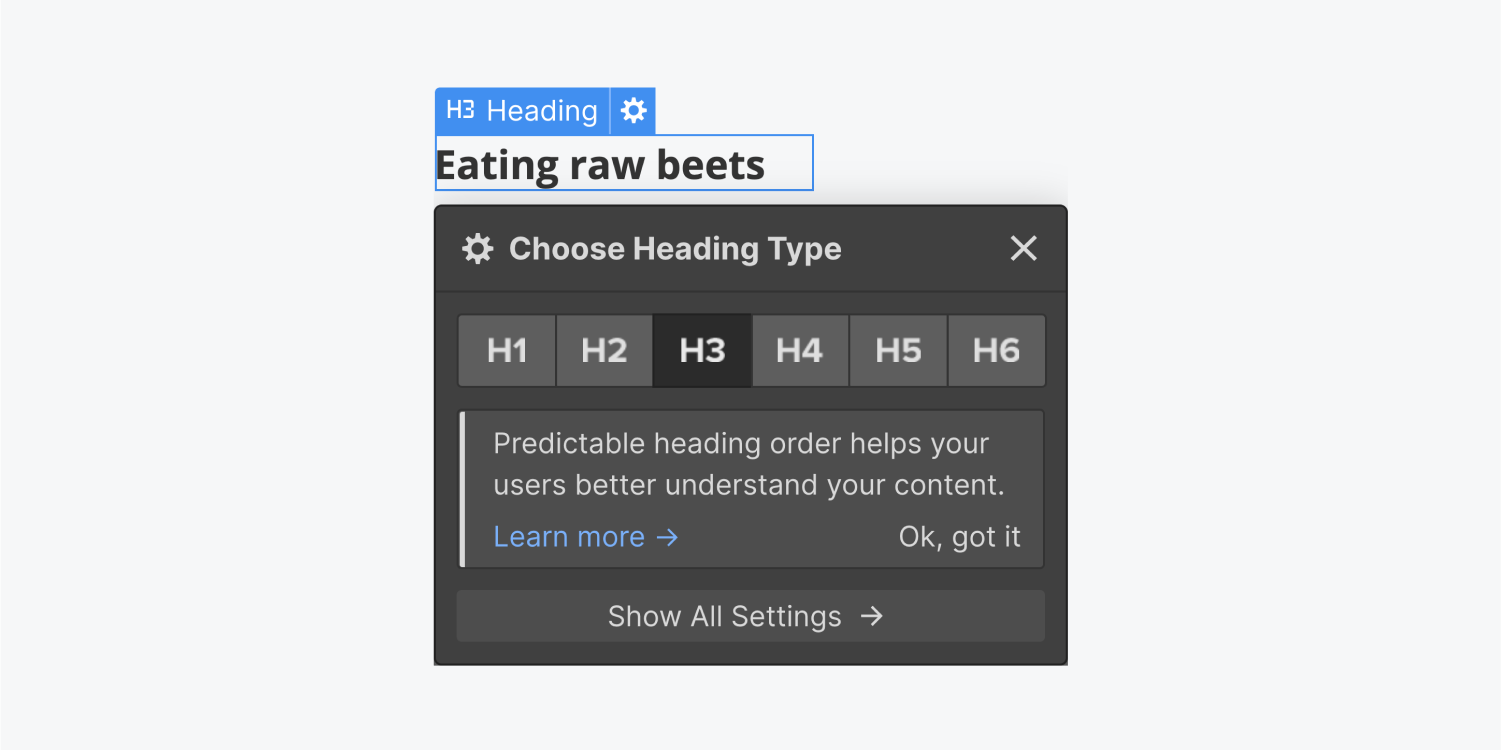
There are 6 options for Headings ranging from largest to smallest: H1, H2, H3, H4, H5, and H6.  

The Choose heading settings panel displays six heading options, a learn more notice and a show all settings button.

Choosing the right Heading

There are many approaches to organizing content on a website using Headings. The top level Heading, the first words your users and search engines see, is usually going to be an H1. You can think of this like a newspaper headline.

A newspaper breakdown of how the H1, H2 and H3 heading structure could be organized and read. Headlines are highlighted with an appropriate heading tag next to it.

Headings should be concise, unique to the page you’re on, and written for humans.   

Other sections of your site may contain subheadings — these typically consist of H2s. H3s can be nested under H2s and so on. Headings are used to give your human users and search engines a good idea of the content on the page.

An H3 heading is selected in the designer. The Choose heading type settings panel is below displaying the H1- H6 heading buttons, a learn more message with a Ok, got it button and a show all settings button.

Style Headings

To style a Heading in Webflow, you can add one onto the canvas from the Add panel. Double click into the Heading to edit the content, then use the Style panel to edit font, font-size, font-weight, color, etc. If you already have a styled heading, you can give it a class name.

On the left, the typography section of the Style panel displays a font dropdown menu, weight dropdown menu, size, height and color input fields, four align settings, six style options and a more type options button. On the right, a class called Section Title is active in the selector panel.

Edit Headings

To edit the text, double-click the element or select it and press Enter. Then, select the placeholder text and replace it with your own content.

Format headings

If you want to bold, italicize, or style specific parts of your Headings, double click into the Heading element and use the context menu to style. You can see examples and read more on this process in Inline text formatting.

Table of contents

Continue learning

Hmm…we couldn’t find any results for “search query”. Try a different search term or check out our community forum.

Search the forumReset the filter
Load more

Filter

Reset
Thank you! Your submission has been received!
Oops! Something went wrong while submitting the form.
Topics
Thank you! Your submission has been received!
Oops! Something went wrong while submitting the form.
Back to top