Control how search engines index your site
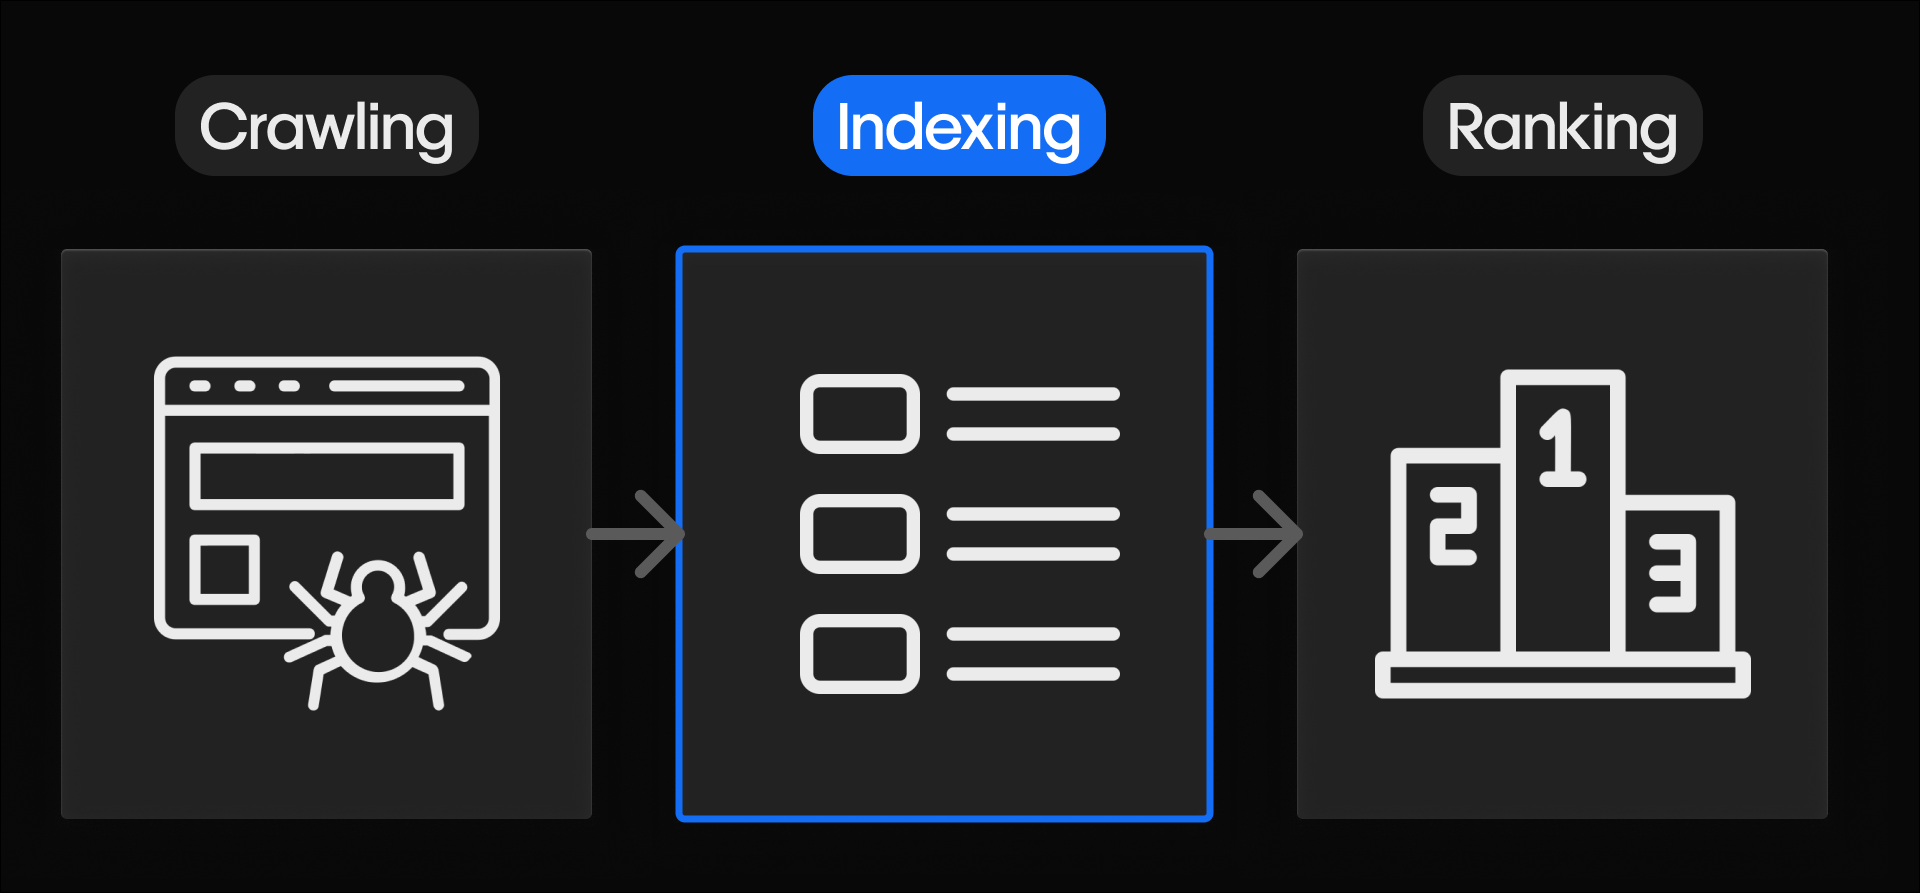
Indexing
Before your site can appear in search results, search engines need to discover your pages and add them to their index — essentially their giant library of content.
It helps to think of a search engine like a digital library:
- Crawling is the librarian walking through the stacks, scanning book covers.
- Indexing is adding books to the library’s searchable catalog.
- Ranking is choosing the best book to hand someone when they ask a question.
This lesson focuses on indexing, because if a page isn’t indexed, it can’t appear in search results at all — no matter how well it’s written or optimized.
Indexing isn’t automatic. You can (and should) guide search engines by clearly showing which pages exist, which pages should be indexed, when pages move, and when pages are removed.
Let’s walk through the tools that help you do exactly that.
Tip: We recommend that you disable the indexing of your staging subdomain so test versions of your site don’t appear in search.
Start with your sitemap
A sitemap is a simple file that lists the important pages on your site. It works like a table of contents that search engines can read. It helps them understand which pages exist, how they’re organized, and where to begin crawling.
Sitemaps in Webflow
Webflow gives you two options: an automatic sitemap or a custom sitemap.
For most sites, the automatic sitemap is the best choice. When automatic sitemap generation is enabled, Webflow keeps your sitemap up to date every time you publish. It includes all live, indexable pages, uses your default domain, and automatically adds localization signals if you’re using Webflow Localization.
Your sitemap will live at: https://www.yoursite.com/sitemap.xml
Custom sitemaps are useful if you need very precise control, but they require manual updates whenever your site changes — which is why most beginners are better served by Webflow’s automatic option.
.png)
Submit your sitemap in Google Search Console
Once you’ve generated your sitemap, you’ll need to tell Google about your sitemap by submitting it to Google Search Console.
This step doesn’t guarantee ranking, but it does remove guesswork by telling Google exactly where to start.
Control which pages are indexed
Not every page should appear in search — and that’s okay. Some pages are meant for visitors but not for search engines. Some examples include:
- Thank-you pages
- Utility pages (login, password reset)
- Duplicate or placeholder content
- In-progress or temporary pages
The Indexing toggle
Every page in Webflow includes an Indexing toggle in Page settings.
- When indexing is on, the page can appear in search results
- When indexing is off, the page is excluded from search
This is the clearest and safest way to tell search engines which pages matter.

Using the indexing toggle helps keep your search presence clean, prevents incomplete or sensitive pages from appearing publicly, and avoids duplicate content issues that can dilute your SEO signals.
Use redirects when URLs change
Sites evolve. Pages get renamed, folders get reorganized, and content moves. When a URL changes, you need a way to guide both users and search engines to the new location. That’s what a 301 redirect does. It’s like leaving a forwarding address when you move. It tells search engines, “This page has a new home, please go there instead.”
In Webflow, you can add and manage 301 redirects in your Site settings — manually or in bulk with a CSV file.
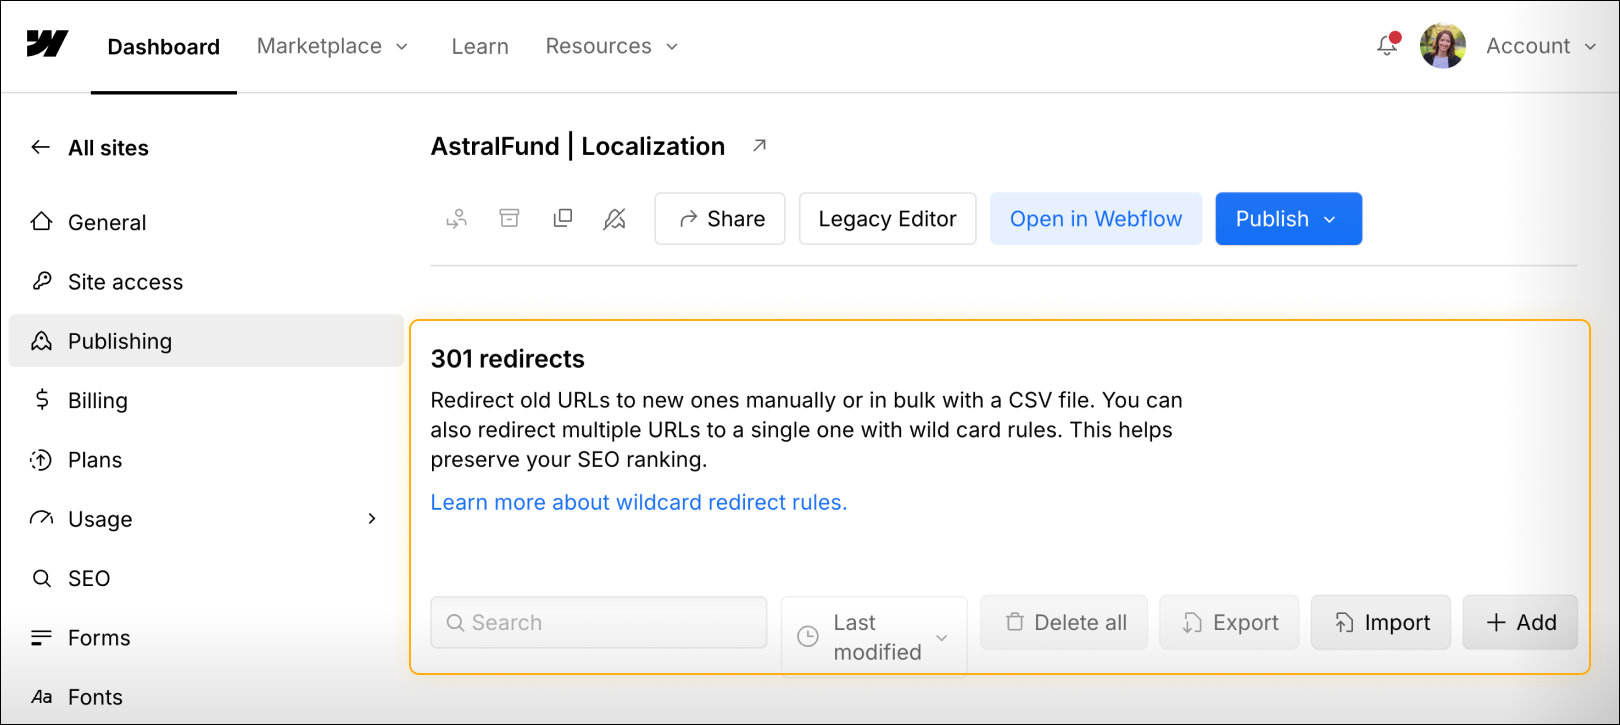
You should use a 301 redirect any time a URL changes — whether you’re renaming a page, restructuring your site, migrating to Webflow, or removing outdated content. Redirects help preserve SEO value from the original URL, prevent search engines from indexing multiple versions of the same content, and keep users from landing on broken pages.
Handle removed pages with a custom 404
If a page no longer exists and has no new home, search engines will eventually treat it as a 404 — Not Found.
Instead of showing a generic browser error, Webflow lets you create a custom 404 page that confirms the page is gone and helps users find their way back to useful content.
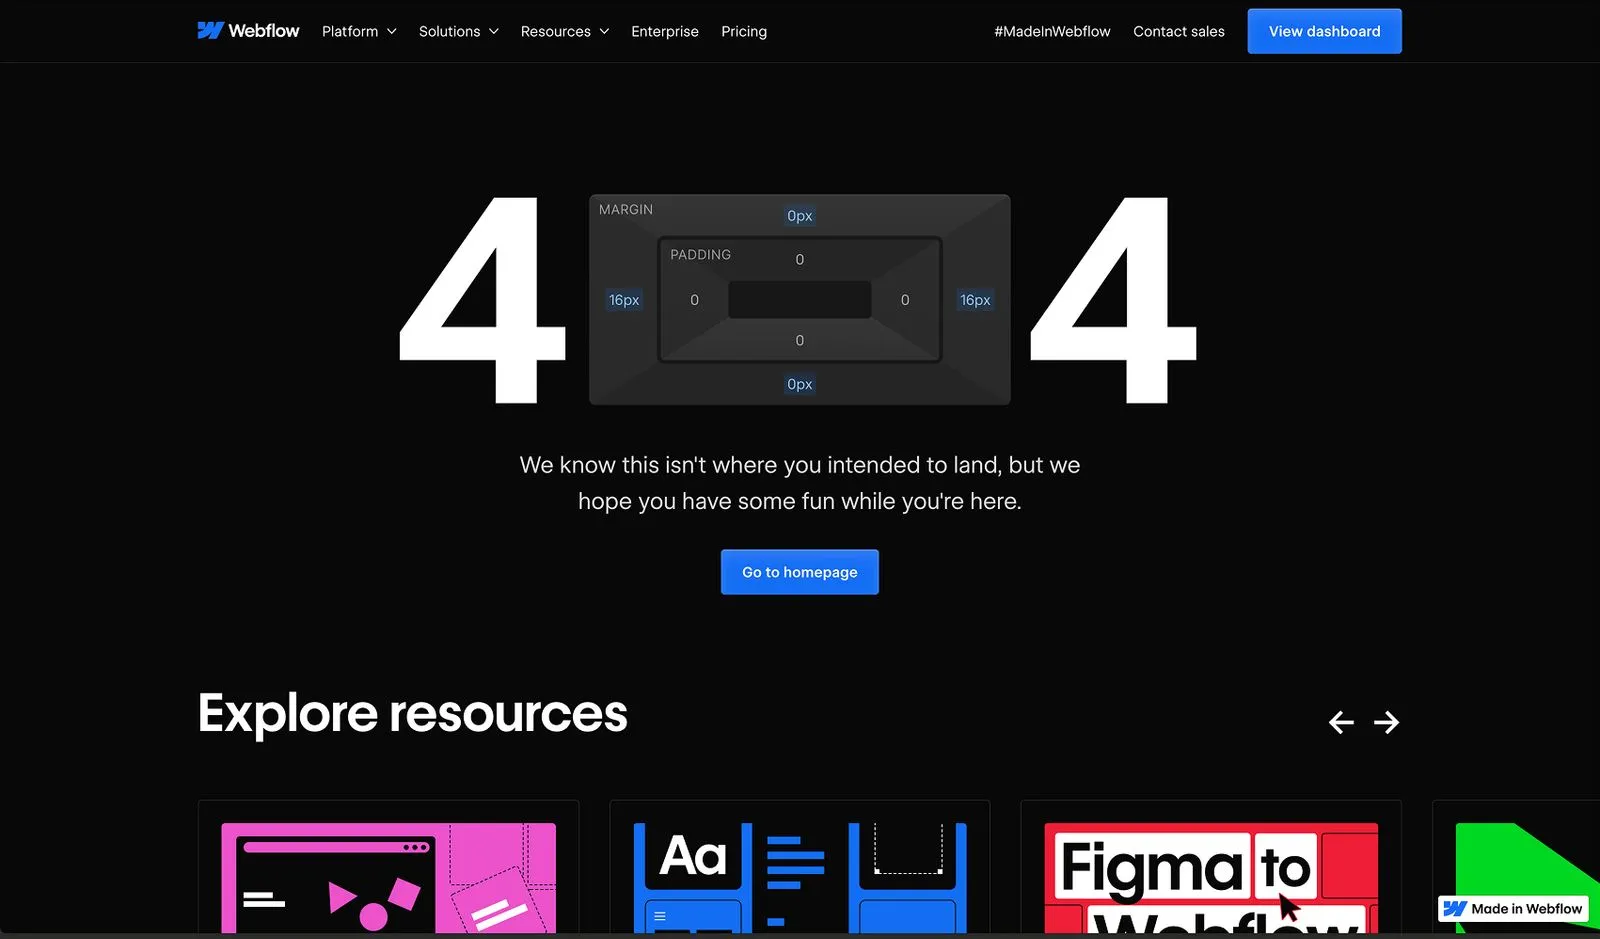
From an SEO perspective, 404 pages are helpful because they signal that outdated content should no longer be indexed, prevent search engines from repeatedly crawling dead URLs, and maintain a better user experience.
A clear, friendly 404 page reinforces your site structure by saying, “This path no longer exists, but here’s where you can go instead.”
404 best practices:
- Design and build custom 404 pages that align with your website’s brand styling.
- Avoid technical language like “404 error” and instead use friendly messaging like “Oops this page doesn’t exist.”
- Add a CTA or helpful links to guide users back to relevant content.
- Keep navigation intact: Make sure that you’re including the main navigation bar and footer so users can easily find their way back.
Tip: Check analytics for visits to your 404 page. If users are hitting broken links, consider setting up 301 redirects to guide them to the right place.
Canonical tags
Sometimes the same (or very similar) content can be accessed through more than one URL. When that happens, search engines need help understanding which version is the “official” one.
That’s what canonical tags are for. A canonical tag tells search engines which URL represents the primary version of a page, so similar URLs aren’t treated as duplicate content or competing pages.
For example, search engines might see these as separate pages unless you clarify:
- URL variations (e.g., http vs. https, www vs. the root domain)
- URLs with parameters applied for filtering and sorting (e.g., https://university.webflow.com/docs vs. https://university.webflow.com/docs?topics=seo)
- Multiple versions of a page that share a common language but differ in dialect (e.g., a page with an Australian English version and a Canadian English version)
Canonical tags help consolidate ranking signals and ensure search engines focus on a single, preferred URL.
You can set a global canonical tag to automagically create canonical tags for every page on your site, or set a canonical tag for a single static page.
- Global tags: When you set your site’s base URL (e.g., https://www.yourdomain.com) as the global canonical tag, that URL is combined with each page’s unique slug to populate canonical tags for every page on your site. The global canonical tag URL should match your site’s default domain. However, if you’re managing duplicate content across multiple domains or subdomains (e.g., using a reverse proxy setup), you may need to set a different canonical URL.
- Page-specific tags: You can also set a unique canonical tag for any static page. This overrides the global canonical tag for that page only. Page-level canonical tags are useful when you have landing pages, campaign pages, or alternate versions of a page that should defer ranking credit to another URL.
Check out these resources to learn more about canonical tags:
Ready for more?
With indexing signals in place, it’s time to improve how your site performs at a technical level. In the next lesson, we’ll explore site-wide performance optimizations that strengthen both your SEO and your user experience.