Personalization optimizations
What is personalization?
Personalization lets you tailor content for different visitor types so that every user sees the most relevant version of your site.
Instead of testing which version performs best for everyone, personalization lets you serve different versions to different groups.
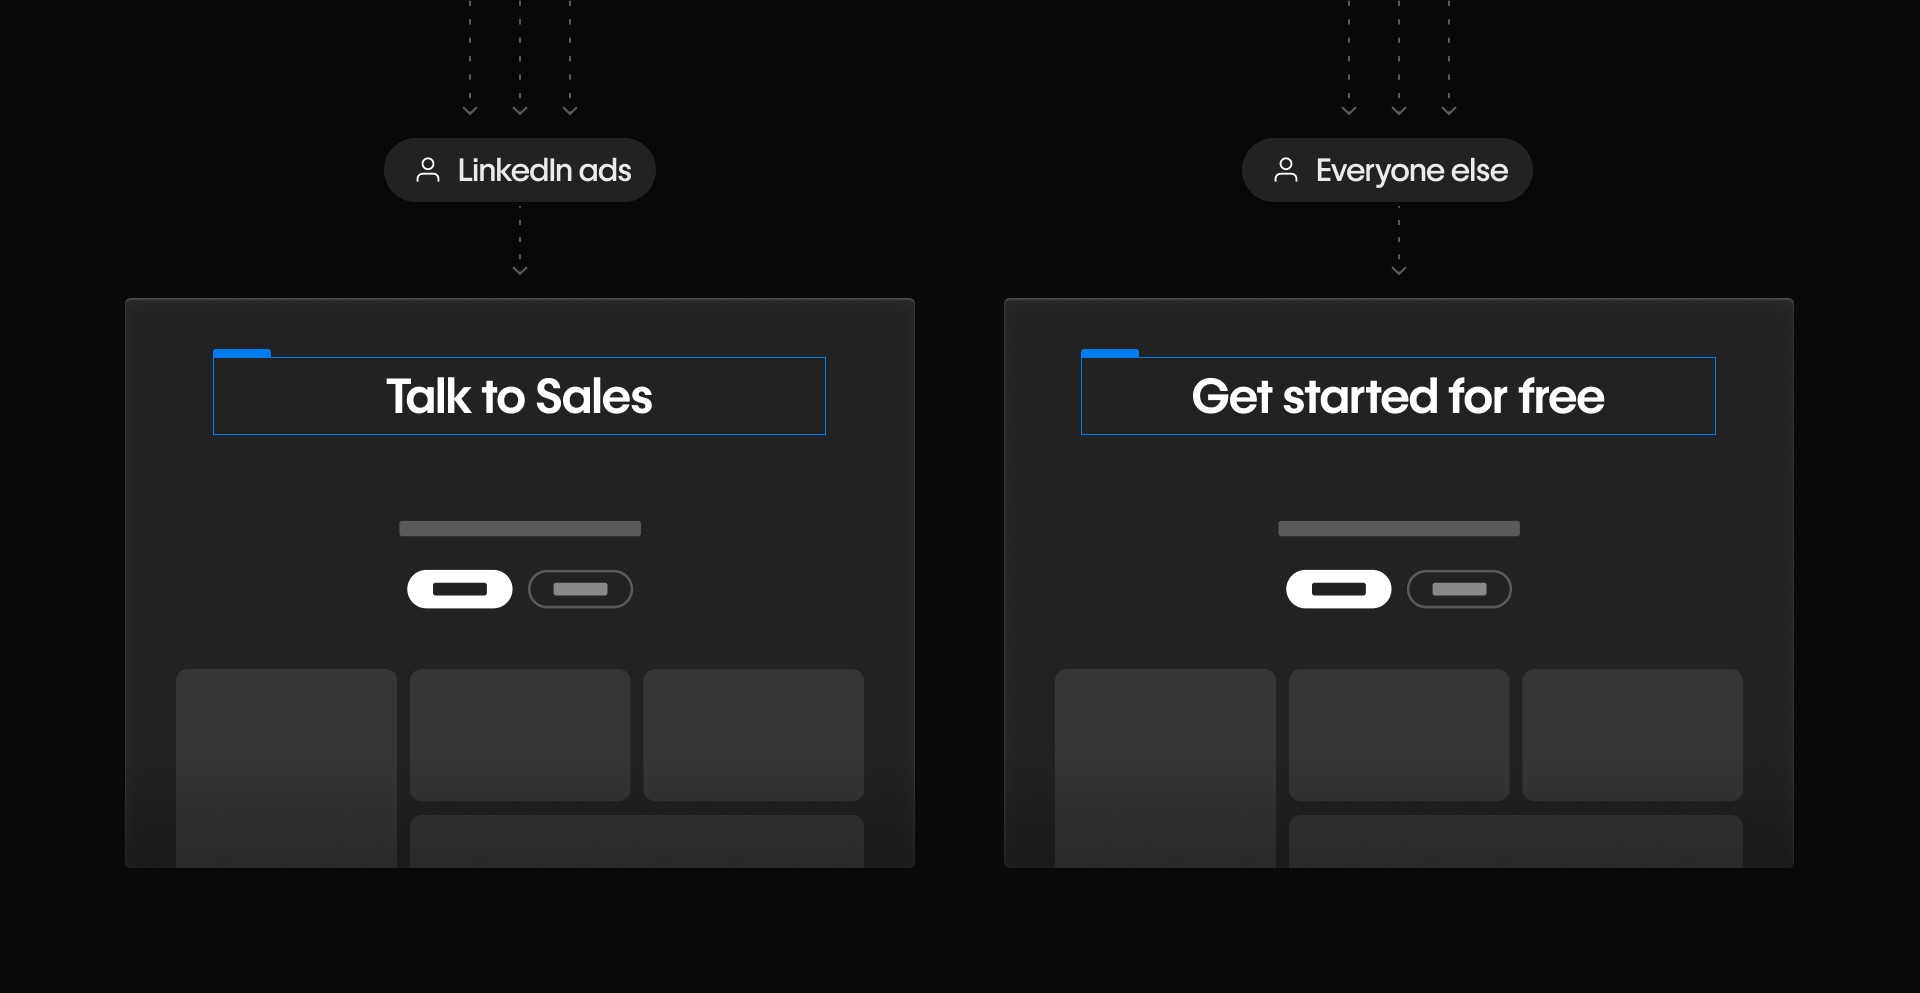
For example, the hero CTA on your homepage may say ‘Talk to Sales’ for visitors from LinkedIn ads, while everyone else sees ‘Get started for free’.
When to personalize (vs test)
Use test optimizations when you're experimenting to find what works best across all visitors. Use personalization when you already have a strategy for tailoring content to specific audience segments.
Here’s a quick comparison:
Test optimization
- Goal: Find the top-performing version
- Versions: 2 or more variations shown to all visitors
- Audience control: Shared across all visitors
- Use case: A/B testing
Personalization optimization
- Goal: Match content to each audience
- Versions: One version per audience segment
- Audience control: Defined per audience
- Use case: Targeted experiences based on visitor attributes
You can run test and personalization optimizations at the same time — just make sure they’re not overlapping on the same page elements.
Audiences are the foundation
Every personalization starts with defining one or more audiences — this determines who sees each version of your content.
You can build audiences using rules based on visitor attributes like:
- Device type: Desktop, tablet, or mobile
- New vs. returning: First-time visitors or returning users
- Location: City, region, country, or DMA (Designated Market Area)
- Time: Time of day, time zone, or day of the week
- Traffic source: Based on referrer URLs or UTM parameters
- Behavior: Based on actions taken during a session, like visiting specific pages
For a full breakdown of available rules, check out our help article about rules-based audiences.
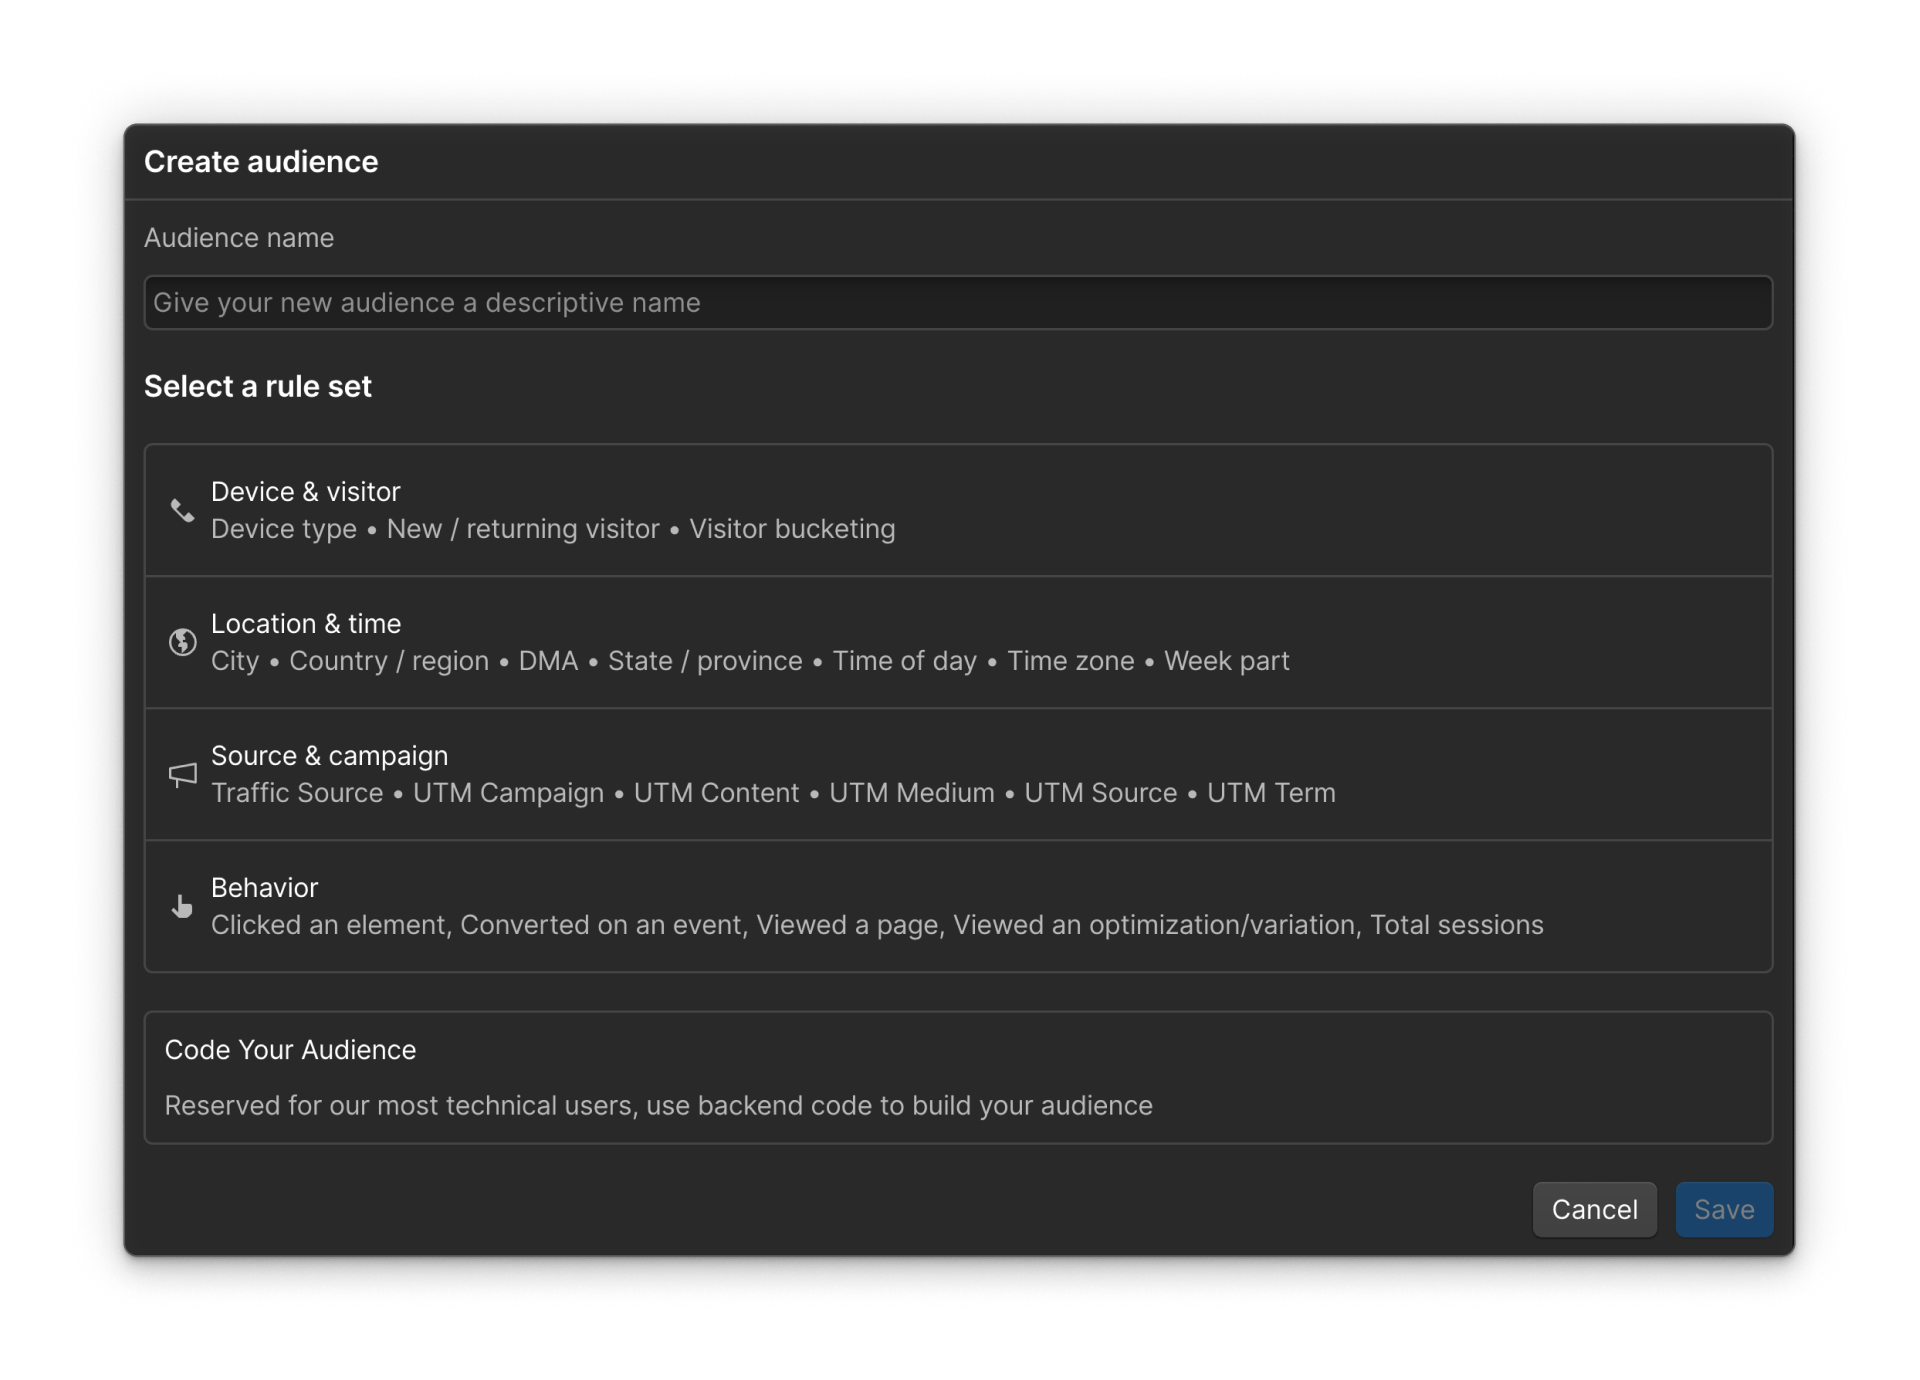
Tip: Want more advanced control? You can also create code-based audiences using visitor behaviors such as users who have a custom tag in your system. These offer more flexibility for dev-savvy teams.
Advanced audience options (available on Enterprise plans)
Enterprise plans unlock even more powerful audience capabilities:
- Custom attributes: Pass visitor data (like user tier or CRM status) via Webflow’s API to use in audience rules or result filters.
- Enhanced Match: Leverages reverse IP lookup to identify company details, which you can use in audience rules or as reporting filters.
- Data from integrations: Combine audience logic with systems like HubSpot or Marketo for highly targeted content delivery.
These tools are great for teams already syncing visitor data across platforms and looking to personalize at scale with precision.
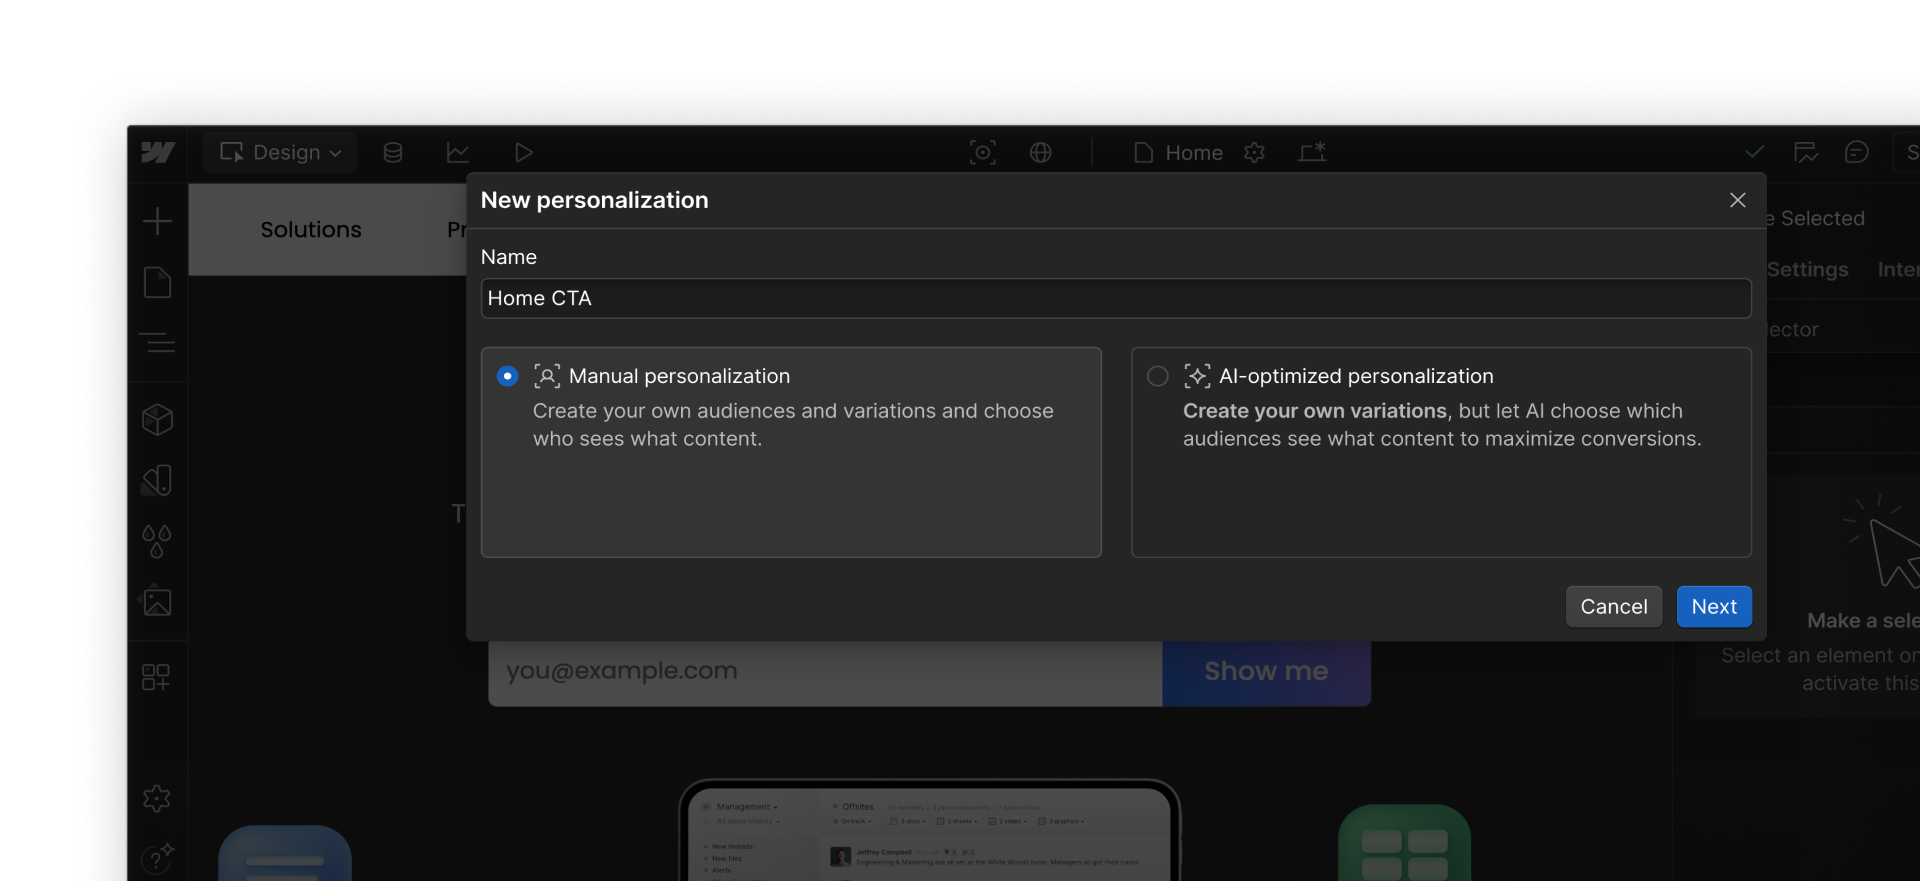
Manual vs AI Optimize: Who delivers the content?
Once you’ve defined your audiences and built your variations, you choose how content is delivered:
- Manual: You control which audience sees which version
- AI Optimize: Webflow learns which content works best for each audience and adapts over time
Example: Personalizing a homepage CTA
Let’s say you want to show different CTAs based on traffic source.
- Manual: You create rules — “Talk to Sales” for LinkedIn traffic, “Get started free” for everyone else. You assign each version directly.
- AI Optimize: You define the same audiences, but let Optimize learn and decide which version performs best for each group — and adapt in real time.
Tip: Use Manual when you're confident in your message for each audience. Use AI Optimize when you want the system to learn and improve based on performance.
How to build a personalization optimization
Here’s what the process looks like from start to finish:
- Create your personalization
Go to the Optimize tab and select New personalization. - Define your audience(s)
Choose rules based on device, source, or behavior — or use code-based criteria for more control. - Design your variations
Create one version for each audience. Use the variation switcher to design them directly in the Designer. - Choose your delivery method
Select Manual or AI Optimize based on your strategy. - Set your goal
Pick a goal that reflects success — like clicks on a button or form submission. - Publish
Once launched, visitors will see the version tailored to their audience segment.
What happens after launch?
Webflow Optimize automatically tracks performance for each variation and audience.
- With Manual, you can compare how each audience is responding to their assigned content.
- With AI Optimize, you can see how the system is adapting over time and which combinations are driving the most conversions.
Check results anytime in your Insights panel, just like with tests.
Ready for more?
Now that you’re building audience-specific content, let’s look at how to define clear goals — and track what’s working, what’s not, and what to try next.