Granular access control
The bigger your team gets, the harder it is to manage who can edit what on your site. With granular access controls (available on Enterprise site plans), you can control each user's access to a site's locales, CMS collections, and pages. This means you can bring on any team member or guest without worrying about who might accidentally edit the wrong thing.
Video transcript
The bigger your team gets, the harder it is to keep track of who is changing what on your site. When everyone has access to everything, mistakes can happen.
That’s why granular access controls, available on Enterprise plans, let you set boundaries for each user on your site, so you can decide exactly which part of the site each person can touch, whether that’s a specific CMS collection, specific pages, or one locale.
In this video, we’re going to play the role of the admin and walk through three real examples. We’ll limit a marketer to a single CMS collection, we’ll lock a monetization team member down to only edit the Pricing page, and finally, we’ll stack all three restriction types together for a regional translator.
Let’s get started with the first one.
Okay, on our team, we have a technical writer, and their whole job is managing blog posts. That’s it. They don’t need access to events, they don’t need to touch landing pages, and they definitely don’t need to be anywhere near the homepage. We just want them in the Blog Posts CMS collection and nothing else.
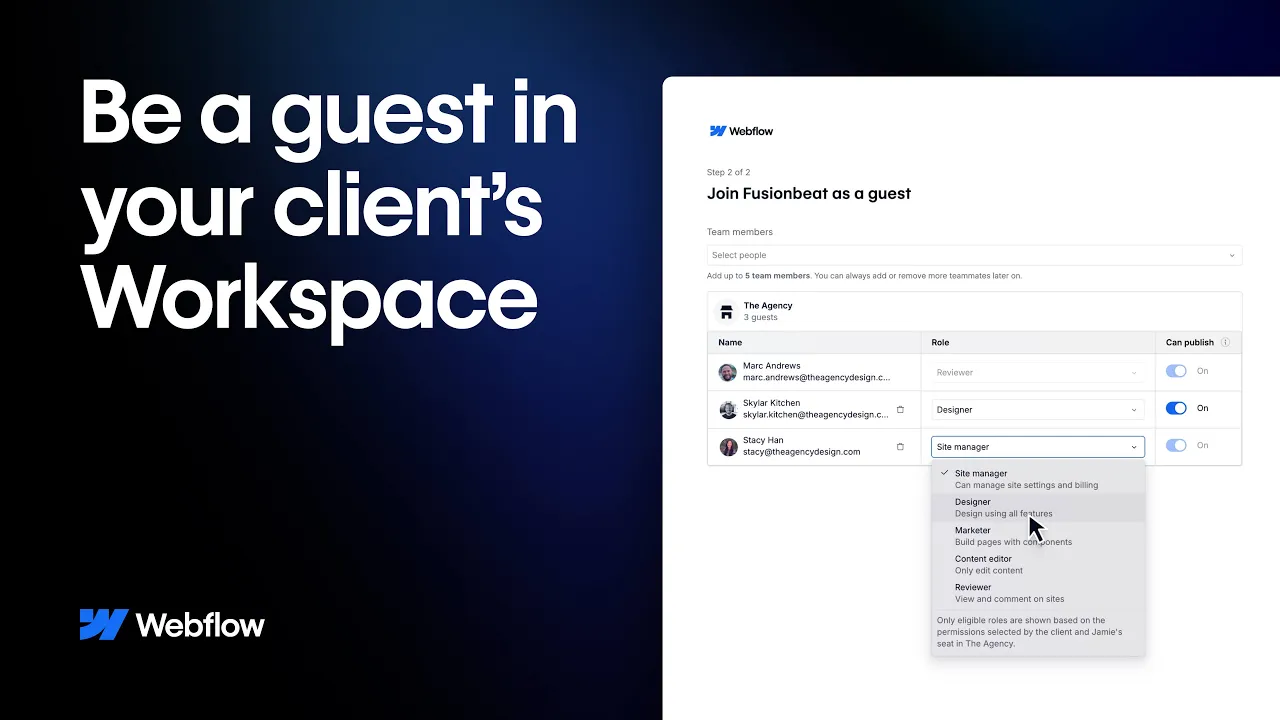
So here’s how we set that up. From Webflow, let’s head into our site settings and go to Site access. We can find our technical writer here and click into their access settings. Now, under CMS, we can deselect all collections and just select the Blog Posts CMS collection. Next, we can head over to Pages and make sure none of the pages are selected. Then let’s save.
So now, when this person opens this site in Webflow, they’ll see the homepage is restricted, so they’ll be able to click around, but they cannot change anything. But they are able to access the CMS. And just like we set, they’ll only be able to edit the Blog Posts collection. The other collections are visible, but they’re view-only. This means this person can focus on what they need to do without accidentally wandering into something they shouldn’t.
That’s the first use case.
Use case number two. Your monetization team needs to update the Pricing page. Pricing changes, plans evolve. It happens. But you don’t want your monetization team member editing anything else on the site, just the Pricing page.
Same thing. Site settings, Site access, find our monetization team member, and click into their access. Under Pages, instead of giving them access to all pages, we select just the Pricing page. And just for good measure, we’ll remove their access from the CMS collections.
Now when they open the site in Webflow, they’ll see they can only edit content, since they’re a content editor, and the only page they can edit is Pricing. Now they can make their updates when they need to, and we’ve removed the risk of them accidentally changing something on a page that has nothing to do with pricing.
That’s use case two.
Now, final part. This is where it all comes together.
Let’s say you’re bringing in a regional translator specifically for the Japanese market. They should only be working in the Japanese locale, and only on blog-related content. Nothing else. Not other collections, pages, or locales.
So let’s set this up. We’re here in Site access, and we’ll click into our translator’s access settings. Under Locales, we’ll deselect everything and select only Japanese. Then, under CMS, we’ll make sure to only select Blog Posts. And lastly, under Pages, we’ll select the Blog Template. This is the CMS page template for blogs. Then save.
Now when this person opens the site, their entire Webflow experience is scoped to exactly what they need. They can edit only the blog page template from the Japanese locale, and they can edit the Blog Posts collection in Japanese. That’s it.
And these were just a few examples, but hopefully they give you a sense of how precise you can get with controlling access. The goal is to match each person’s access to exactly what they need, so your team can move faster without stepping on each other’s toes.
That’s setting up granular access control in Webflow.